1 – Why should I change DNS?
You “use” them in any moment, every time you are in front of a computer but usually you don’t consider to directly manage or change them because you think that it is not worthy to do anything with them.
On the contrary, you know that many different online companies offer dedicated DNS addresses you can use to substitute the default DNS addresses provided by your ISP.
So, at this point, your main question is “Why should I change DNS on my route or my computer”?
For example, for one or more of these different reasons:
– to have a chance of a possible increasing of speed and reliability when you surf Internet;
– if you want to delegate to a third “professional” part some security tasks (e.g. third party security filtering to protect yourself against phishing or viruses);
– acces websites that are normally geoblocked by commercial policies/agreements or censorship imposed by Governments;
– parental monitoring if you prefer to have a rough idea of what websites your children visit or if you whant to filter some specific contenents.
2 – Choose a reliable DNS provider
If you decide that you want to try a different DNS provider you need to choose a reliable one. A quick search on Internet will help you to find the most appropriate DNS Provider for your needs.
In this specific case we are examining how to configure the DNS from OpenDNS.com so, if you want to test it, you have to sign up for a free account on opendns.com or simply copy the DNS addresses you find in the bottom right of their homepage or sign up for a OpenDNS.com free account. In the last case, you have the possibility of monitoring your traffic in a professional statistical way and probably you will satisfy one or more of the reasons that may explain your choice to use different DNS.
3 – Install DNS from OpenDNS on your router
If you want to use OpenDNS on your LAN you have to configure the router through the its configuration interface. The way you can do this varies from one router to another but in all the popular models you will easily find a specific sub-menu where you could activate the “use predefined DNS” option compiling the two addresses provided by OpenDNS.
In this way all your LAN traffic will be pipelined through OpenDNS and you will not need to singularly configure each computer you have.

Image from: oriental-press.com
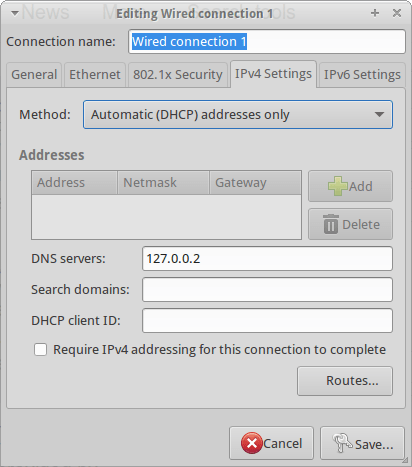
4 – Install DNS from OpenDNS on your Linux computer
4a – Preliminary configuration.
The problem with opendns.com is that it doesn’t provide an official tutorial to correctly install its DNS on a Linux machine. For this reason you can follow this brief notes that I wrote after installing it on a Ubuntu 14.04 LTS Ubuntu computer.
Go to the OpenDNS.com support page dedicated to the installation on Ubuntu and follow their instructions:
I exactly followed all the instruction till the point 8 but, when I had big problems when I typed:
sudo ifdown eth0 && sudo ifup eth0
because this message appeared:
ERROR unknown interface eth0=eth0
The matter is that my ethernet is really named eth0 (I double checked using the commands ifconfig and netstat -r -n) but it was not possible to operate on it.
To solve this problem I used the Poorak’s Blog suggestion and I had to open the interface file via Terminal with:
sudo nano /etc/network/interfaces
– or if you prefer:
sudo gedit /etc/network/interfaces
and manually add these lines:
auto eth0
iface eth0 inet dhcp
then I restarted my networking
sudo /etc/init.d/networking restart
4b – Install DDclient on Ubuntu if you have a dynamic IP
Normally the Internet Service Provides provides a dynamic IP to users that may change over time. So, if you don’t want to pay more to obtain a static IP, you need to install a software that could constantly communicate your actual IP address to OpenDNS.com. In my case, I dedcided to install DDclient to be able to continue to properly use the OpenDNS.com services.
To install DDclient I preliminarly had to install coreutils through Terminal:
sudo apt-get install coreutils
and the required SSH and SSL sockets:
sudo apt-get install ssh libio-socket-ssl-perl
and finally the DDclient:
sudo apt-get install ddclient
At this point you manually edit the configuration file:
sudo nano /etc/ddclient.conf
(or, if you prefer sudo gedit /etc/ddclient.conf)
typing:
##
## OpenDNS.com account-configuration
##
use=web, web=myip.dnsomatic.com
ssl=yes
server=updates.opendns.com
protocol=dyndns2
login=opendns_username
password=opendns_password
opendns_network_label
where:
– ‘opendns_network_label’ is the label given to the network you’re updating in your account.
If you have spaces in your network label, replace them with an underscore ( _ )
You can find the network label in the Settings Tab of the OpenDNS Dashboard.
– the login is your email address with OpenDNS
– the password is your opendns password.
“If you have special characters in your password wrap the password in single-quotes ( ‘ ).
If there are any single-quotes in your password, put backslash ( \ ) before the single-quote to escape the character”.
References:
5 – Start OpenDNS and DDclient on your Ubuntu computer
At this point you have all the elements to start so you can open a Terminal and type:
sudo /usr/sbin/ddclient chkconfig ddclient on && sudo /usr/sbin/ddclient service start
On the other side, if you want to check the status of DDclient, you will type:
sudo /etc/init.d/ddclient status
6 – Configure Linux OS to start DDclient at boot on Ubuntu
On Ubuntu is really simple to configure DDclient to start at the computer boot. You have to open the Session and Startup manager through the desktop Dash. Now you are able to Add a specific command to the Application Autostart menu to run DDclient at the boot:
sudo /usr/sbin/ddclient chkconfig ddclient on && sudo /usr/sbin/ddclient service start
If you are configuring OpenDNS through DDclient on a different Linux distribution you can google the right tutorial or follow the guide created on aboutLinux.info.
At this point you will automatically use OpenDNS on your Ubuntu computer.