Category Archives: Ubuntu

Ubuntu 17.10: Finally, an exciting Ubuntu release by https://is.gd/ePcNMx

The days of the boring Ubuntu releases are over. The release of Ubuntu 17.10 was going to be the final iteration to include the ousted Unity desktop interface.

Instead of following the pattern Ubuntu has held since it attempted to bring convergence to the Linux desktop, Canonical is going to jettison its in-house desktop earlier than originally scheduled.

from https://is.gd/ePcNMx

Selected by Galigio via Computer Borders

Ubuntu Power Users Have a New Toy To Play With: Ubunsys by https://is.gd/3x6Sdv

Today I came across Ubunsys, an advanced system utility for Ubuntu 17.04, and I think power users among you may find it useful.

Ubunsys, which is under active development and not yet considered stable, exposes various advanced security, package management and system settings in a straightforward wizard-style UI.

from https://is.gd/3x6Sdv

Selected by Galigio via Computer Borders

Never Miss an Email Again: Gmail Notification Extension for GNOME Shell by http://bit.ly/2qvWajl

Looking for an easy way to get Gmail notifications on the GNOME desktop? Well, you needn’t look any further.

The Gmail Message Tray GNOME Extension does exactly what you want: shows you notifications of emails in the GNOME message tray (aka ‘notification centre’ aka ‘date/time indicator’).

One of the main reasons I use a desktop email client such as Thunderbird or Geary is the ability to receive notifications on the desktop as and when new email arrives.

from http://bit.ly/2qvWajl

Selected by Galigio via Computer Borders

Atom is now available as a snap for Ubuntu by https://is.gd/AM69Sd

There’s a new desktop snap in the Snap store: Atom. Launched in 2014, Atom has been rapidly adopted by a large community and is considered one of the top language agnostic code editors. It offers a constantly growing library of 6 000+ addons for all purposes, from themes to IDE features.

from https://is.gd/AM69Sd

Selected by Galigio via Computer Borders

Mark Shuttleworth: Ubuntu on the Desktop Will Remain Important to Canonical by https://is.gd/UmTnyZ

mark-shuttleworth-ubuntu-on-the-desktop-will-remain-important-to-canonical

The Canonical and Ubuntu founder was interviewed there by theCUBE, who were very curious to know what the state of Ubuntu Linux was these days.

Mark Shuttleworth answered that his dream was always for Ubuntu to go mainstream on desktop, cloud, and IoT, but things don’t always go the way we want them to. According to Shuttleworth, Ubuntu appears to be the de facto standard for cloud computing and data centers.


from https://is.gd/UmTnyZ

Selected by Galigio via Computer Borders

3 steps to install DNScrypt to improve your privacy – Ubuntu version

Also if you use OpenDNS to improve your standard of privacy, you are not protected by “last mile” dangers but you can boost your security installing DNScrypt on your digital device. DNScrypt “works by encrypting all DNS traffic between the user and OpenDNS, preventing any spying, spoofing or man-in-the-middle attacks”.

DNScrypt “is a protocol that authenticates communications between a DNS client and a DNS resolver” and it “is not a replacement for a VPN, as it only authenticates DNS traffic, and doesn’t prevent “DNS leaks”, or third-party DNS resolvers from logging your activity”.

For this reason you have to be conscious that DNScrpt is just a -very good- improvement of your privacy but not the definitive solution to all your privacy concerns.

DNScrypt is so versatile that you can install it on every kind of device you prefer. In fact it is possible to download DNScrypt for servers, IOS, OSX, Android, Windows and Linux computers (DNScrypt-proxy version). Obviously the installation and setup will vary a little depending the OS you installed on your device.

Concept-Skyscraper-Feeds-on-Air-Pollution-Uses-It-to-Grow-433607-2

Image from softpedia.com

Here we are talking about DNScrypt installation on Ubuntu.

For this purpose I suggest to use the Terminal that allows you to install DNScrypt i just 3 steps:

sudo add-apt-repository ppa:anton+/dnscrypt
sudo apt-get update
sudo apt-get install dnscrypt-proxy

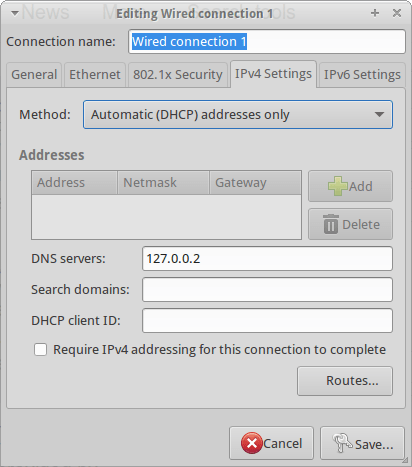
Last but not least, you need to interface the Internet traffic of your computer through the DNScrypt-proxy. For this reason you have to Edit your Network Configuration and add the address 127.0.0.2 to the “DNS Servers” line as for the below screenshot:

DNSCrypt

Now you can start DNScrypt just typing:

sudo dnscrypt-proxy -R opendns -a 127.0.0.2:53 -u okturtles

Where, in my specific case, okturtles is the name of the remote DNS resolver I decided to use. I chose that specific risolver from the list I found into into my computer after DNScrypt-proxy installation:

/usr/share/dnscrypt-proxy/dnscrypt-resolvers.csv

As usual in similar situations, you may want to spend another couple of minutes to configure your computer to start DNScrypt at the computer boot. Open the Session and Startup manager through the desktop Dash and Add this specific command to the Application Autostart menu:

sudo dnscrypt-proxy -R opendns -a 127.0.0.2:53 -u dnscrypt

Link

ubuntugnomea

Image: Jack Wallen


Ubuntu GNOME 15.10: The perfect Linux desktop distribution


Hibernate for Ubuntu

Since the Ubuntu 12.04 LTS the hibernate icon disappeared as possible option at the shutdown. It is not a big loss if you are not used to use (or overuse) it as I often do. Personally I think that the hibernate feature is really useful when you want to freeze your computer maintaining all the windows -and the work- you are working on at a precise moment. 

Ubuntu decided to “cut” this particular command from its GUI because it registered a remarkable number of problems caused by hardware conflicts in modern computers. 

If you use Ubuntu and you think that hibernate could till be useful for you (especially during busy working days), it is possible to insert again this specific feature as GUI on your Desktop.

First of all you have to test if your computer contains the right hardware for “hibernate” so open Terminal and type:

sudo pm-hibernate

The computer will hibernate itself but you have to reboot it to understand if hibernate worked properly in your case.

I hope (as it was for my PC) that all has gone well. In this case you can start to create the dedicated icon on your upper bar.

Before of starting it’s necessary to understand that the hibernate command will use the SWAP partition to save your temporarily data. Usually it is recommended to have a SWAP partition with, at least, the double of space of your RAM.

So I suggest to install Gparted to check the SWAP space and, only if necessary, increase your SWAP partition reducing the primary partition. Please, do this only after you safely backup all the data in your computer because this procedure could be risky if you are doing it for the first time and you have not enough experience:

sudo apt-get install gparted

Open a Terminal and install gedit and gksu (if you don’t have them already installed on your machine) typing:

sudo apt-get install gksu && sudo apt-get install gedit
Then type:
sudo gksu gedit /etc/polkit-1/localauthority/50-local.d/com.ubuntu.enable-hibernate.pkla
Now a blank gedit document, named enable-hibernate.pkla will appear on your screen.

Copy and paste the following text to “compile” it:

[Enable Hibernate]

Identity=unix-user:*

Action=org.freedesktop.upower.hibernate

ResultActive=yes

Save it and reboot your computer.

A new icon will appear on the right corner of the upper bar. When you click on it, a Terminal window will appear asking for the system password. Type it and click on Return and your PC will immediately hibernate. 

Good busy working days!

How to configure Firestarter to use VPN services on Linux

VPN LinuxIn my experience Firestarter is a effective firewall and, on Linux, it starts automatically every time we boot up Ubuntu. But, when I decided to use a VPN tunnel through openvpn, I had some connection problems. In fact I was able to initialize my VPN services but, after a while, all the internet connections were mysteriously shut down.

The “problem” was Firestarter which cut off the connection as forbidden considering my inbound/outbound Policy.

To solve this matter you have to open a tunnel on Firestarter to allow VPN working:

1- open the configuration file my VPN provider gives to its users (generally its a text file containing all the configuration info used, in my case, by openvpn) and I searched for the IP address of the default starting connection used to authenticate the VPN services (e.g. 177.458.563.25). Save somewhere or memorize this VPN IP address.

2- open a Terminal and type:

sudo nautilus

3- using nautilus go to File System (it’s before home folder) and open etc–>firestarter and open the file user-pre using Gedit (or your preferred text editor)

4- the user-pre file is usually empty so don’t panic and write these lines into it:

iptables -A INPUT -j ACCEPT -s xxx.xxx.xxx.xxx -p esp
iptables -A INPUT -j ACCEPT -s xxx.xxx.xxx.xxx -p udp -m multiport -sports isakmp,10000
iptables -A INPUT -j ACCEPT -i tun+
iptables -A OUTPUT -j ACCEPT -d xxx.xxx.xxx.xxx -p esp
iptables -A OUTPUT -j ACCEPT -d xxx.xxx.xxx.xxx -p udp -m multiport -dports isakmp,10000
iptables -A OUTPUT -j ACCEPT -o tun+

Now you have to substitute the xxx.xxx.xxx.xxx with the VPN IP address you have found at step 1 (in my example was 177.458.563.25).

5- Save the user-pre file and close Gedit and Nautilus

6- open a new Terminal and restart Firestarter typing:

sudo /etc/init.d/firestarter restart

That’all! Now your VPN works on your Linux computer and Firestarter has accepted a new Routed IP Tunnel into its allowed policies configuration.  AddThis