Category Archives: Linux Tips

TrueCrypt – Try it again! Waiting for CipherShed…

truecryptlogo_256TrueCrypt is safer than we thought! A specific audit tested TrueCrypt 7.1 unmantained through a complex verification process and the results are surprising.

First of all we have to consider that TrueCrypt is not mantained since 2014 and that its “natural” fork, VeraCrypt, is directly developed by Microsoft. For this simply reason many former TrueCrypt users prefer not to use VeraCrypt.

Secondly, the bugs revealed by the testers in TrueCrypt are less worrying than that discovered using its competitors solutions.

For this reason I decide to install TrueCrypt (that I use previously it was unmantained) on my Fedora 22 laptop.

To begin, I searched for a good repository and, at the end, I opted for that mantained by GRC. So I downloaded the TrueCrypt 7.1 archive from GRC that is still storing all the others TrueCrypt versions.

I decided to use the 7.1 version because it has more features than the last 7.2 version (the last known release of TrueCrypt). In any case I am monitoring the Swiss website and I wish that the CypherShed project will be completely developed soon.

After I extracted the file and moved it to a specific folder.

Last but not least I opened Terminal and typed:

sudo ./truecrypt-7.1a-setup-x64

and the software was correctly installed into my Fedora 22 OS.

After some tests I can adfirm that TrueCrypt is still a good security solution not only for the above mentioned audit but also because it is really stable, flexible, full of useful features and simple to use.

To sum up: Try it… again!

Synkron: a flexible & powerful way to synchronize your files or folders on Linux – An “encrypted” example for security and privacy reasons

Sometimes it is really easy, other times you waste your time. A good synchronization between files or folders is something you need everyday but it could become a nightmare if you miss something.

In my specific case I need to automate a synchronization between a folder (F1) where I usually save my office files (Documents) with a second folder contained, for security reasons, in an encrypted volume/partition (F2). This last folder (F2) automatically synchronize its content with a third folder (F3), located in the same encrypted volume/partition, that is the client folder of a remote storage hosting (F4).

This also means that when I am out of the office and I add a file in the online storage host (F4) the document is automatically copied to the client folder of the remote storage hosting and to the folder located in an encrypted volume/partition (F2 and F3).

Moreover, I need to erase the Documents folder F1 as soon as it is synchronized with its mirror F2 in the encrypted volume.

The described scenario is common in the everyday working life and it is conceptually not hard to solve… in theory… When I tried to set up the above described operations using grsync on Fedora and Ubuntu I had big problems to obtain an acceptable result.

Many times the synchronization was unidirectional and I was not able to run it properly just using grsync still I found one right solution with Synkron. Synkron  is a multi platform software (Linux, OSX, Windows and portable) written in C++ that is really flexible for all multitasking synchronization needs.

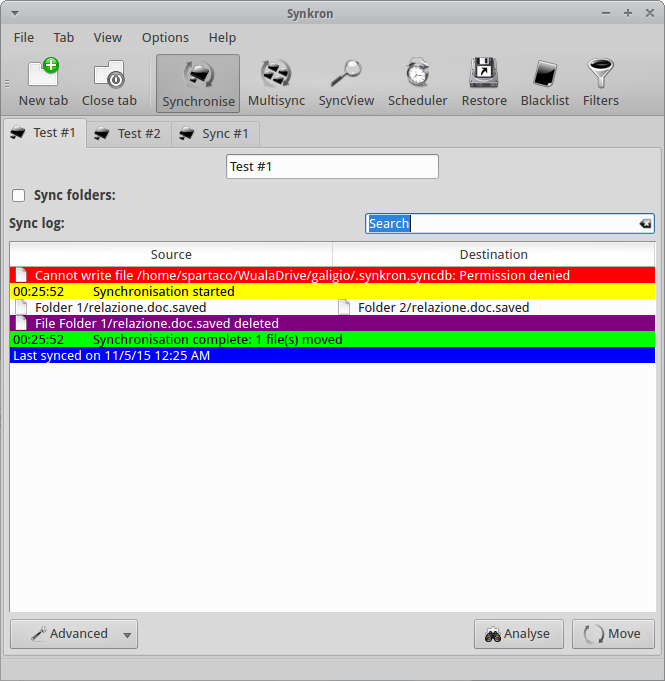
First of all, Synkron is multi-tab and this is a winning features because it let you to “slice” any problem (synchronization matter) into simple, easy to solve, tasks.

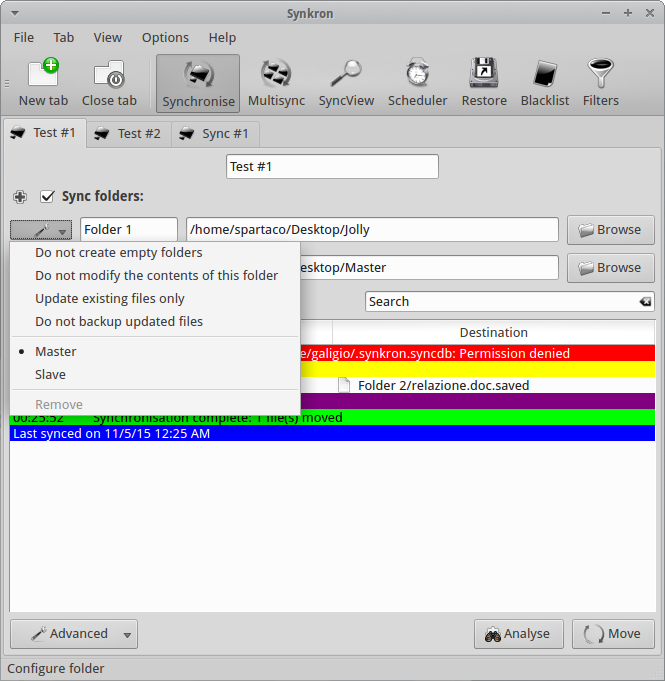
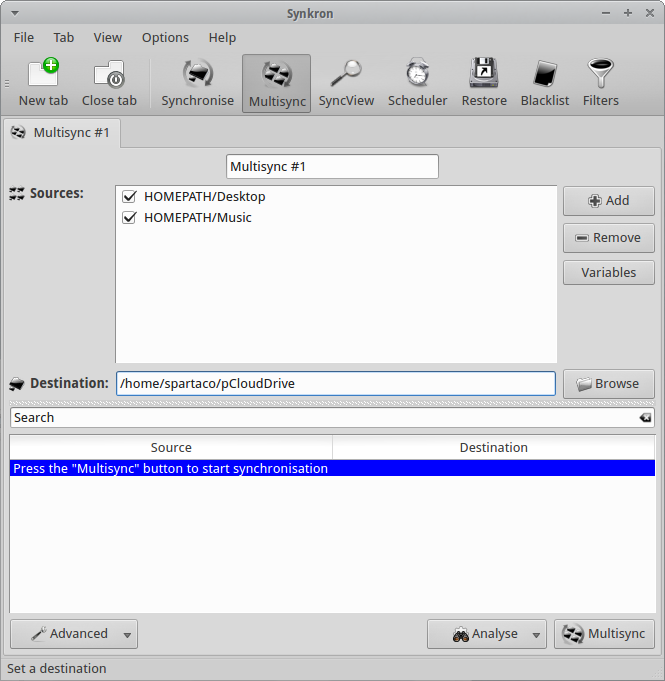
In my example I determined the two Folders I wanted to sync – F1 & F2) and  decided thath both folders had to be considered as Master by the software.

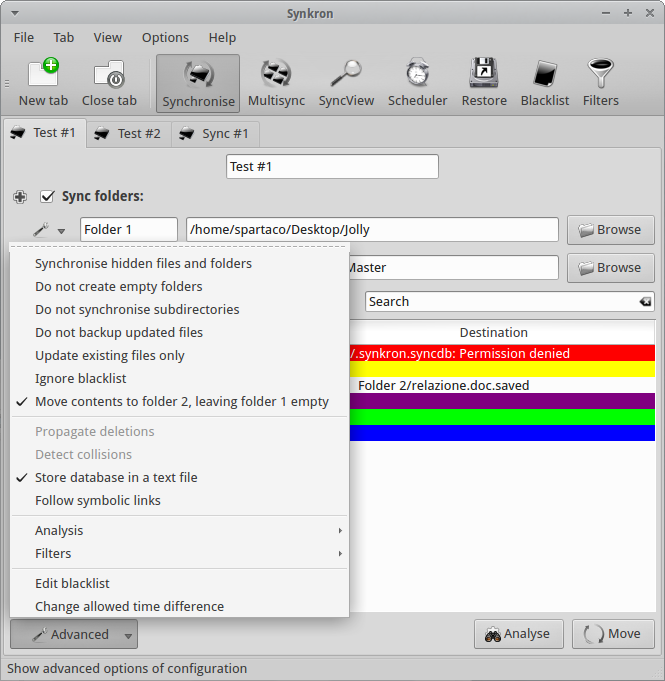
Then I used the Advanced Menu and I chose to “Move contents to Folder 2, leaving folder 1 empty” and to “Store database in a text file” for my convenience (F1 to F2 deleting F1 contents after synchronization).

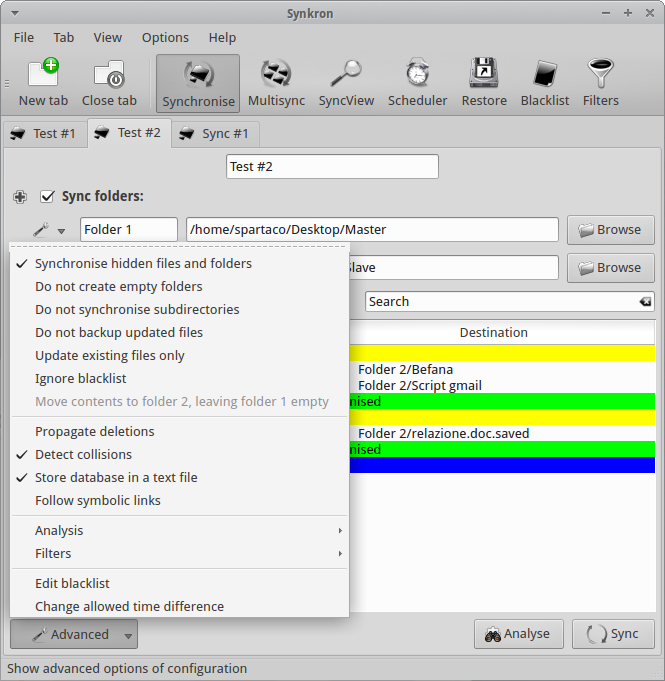
At this point, I opened a second synchronization tab where I selected two folders (F2 to F3 sync) and I also asked Synkron to “Synchronize hidden files and folders” and to “Detect collisions”.

At this point I had obtained an acceptable solution to my initial task, simply dividing my problem into two separate operations.

Moreover, I’ld like to focus your attention on the fact that Synkron has a specific feature for multi-synchronizing three or more folders at the same tome. The tuning of this particular feature is really intuitive and you can also selected many of the different advanced options we described here above.

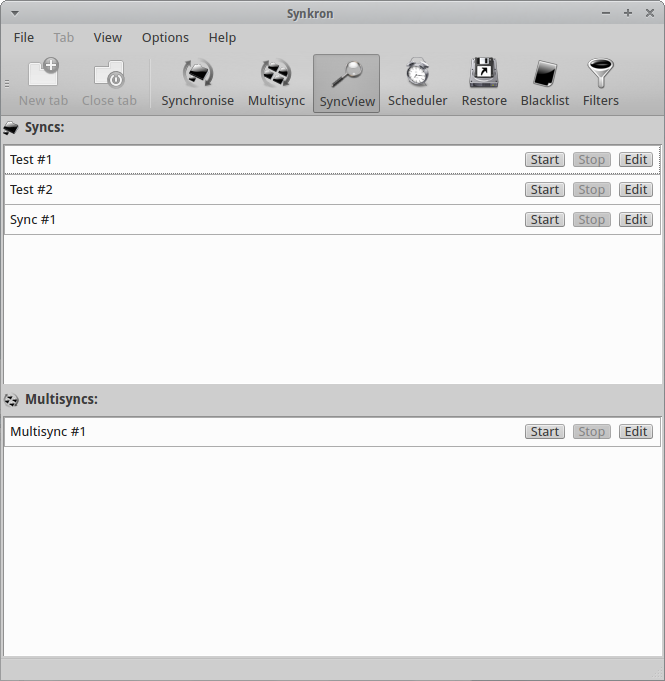
If you have complex synchronization needs and you have many tabs configured you can always choose what tabs you want to activate or deactivate using the “Sync folders” option you find in the upper part of each tabs. Another option for this specific issue is represented by the SyncView visualization that let ypu to have a quick general glimpse about the state of all the sync and multisync tabs.

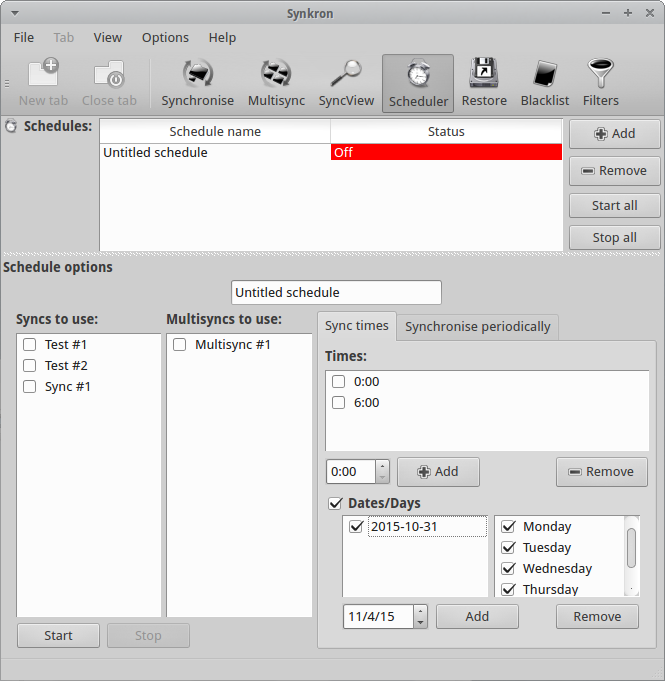
Synkron has simply fantastic scheduling options that are able to solve any need you may have.

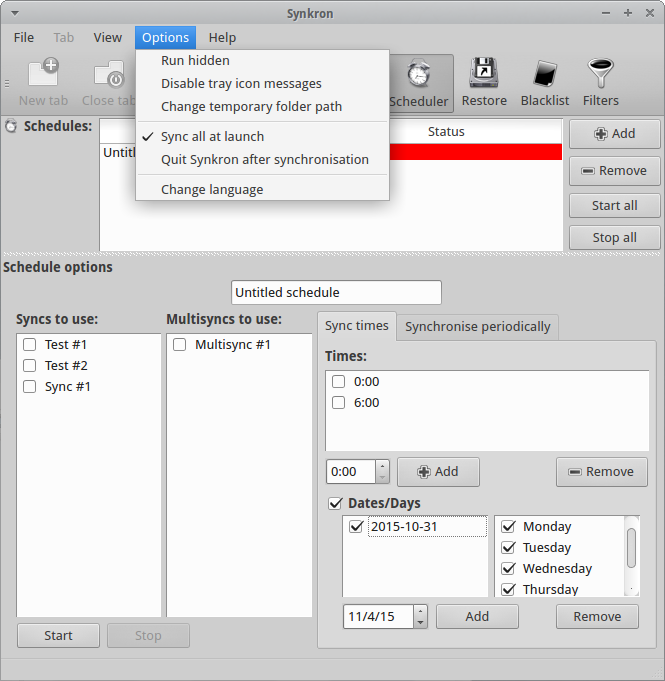
Furthermore you can decide to automatically synchronize your folder as soon as you launch Synkron.

You can also decide to automatically run Synkron at the startup but, in this case, you need to manually configure your Startup Menu.

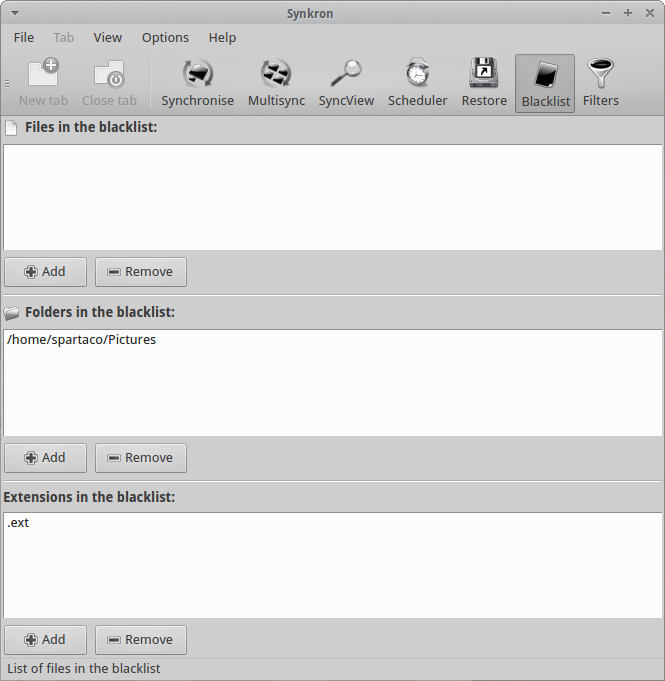
As extra features you can always decide to create Blacklists that will exclude specific files, folders or extensions from the synchronization.

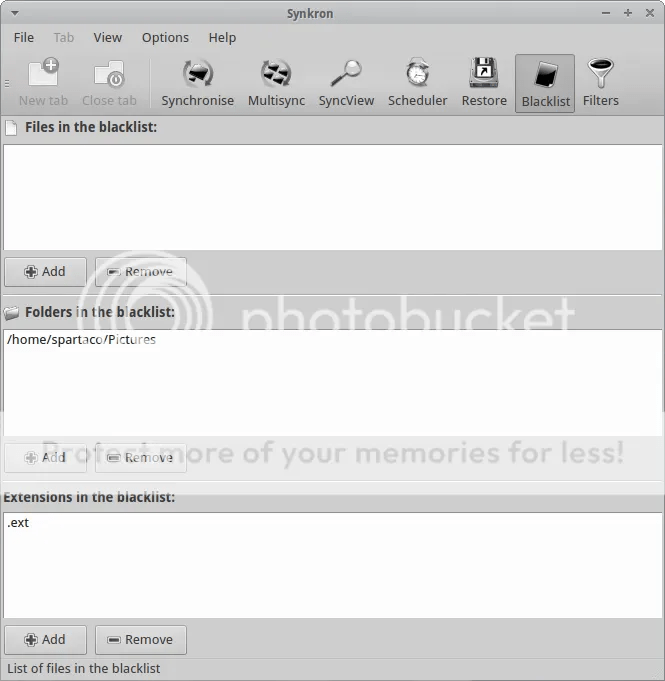
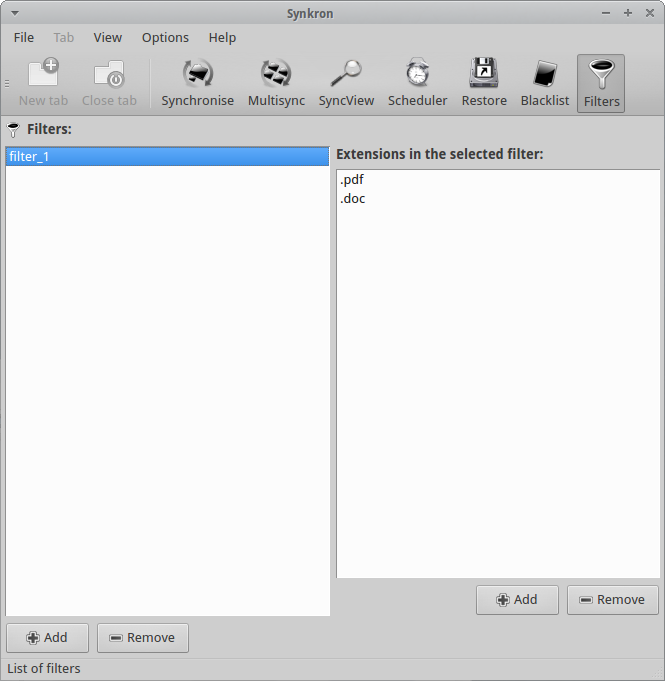
In addition you can define Filters by extensions to better refine your synchronization.

Last but not least, when you run Synkron you obtain a detailed report in real-time where you can check the state of operations by colors.

Link

    The Family Office

“Username is not in the sudoers file. This incident will be reported…” How to add a specific user to sudoers on Linux

Sooner or later, if you use Linux and you prefer Terminal to GUI you will stumble on this message:

Username is not in the sudoers file. This incident will be reported

The first thing to clarify is that the “incident” will never be reported outside your computer but in the auth.log file. But if you have previously configured your Linux OS to send these kind of logs to you by email, you receive an alert about.. your own activity with sudo…

In any case, to solve the above mentioned specific sudo matter, use Terminal and type:

sudo gedit /etc/sudoers

At this point the text file “sudoers” will be opened and you will be able to modify it using e.g. gedit.

Obviously you can use another text editor you prefer as, for example, nano. In this case the command will be:

sudo nano /etc/sudoers

Now you have to peer into the text and find the “#User privilege Specification” section and add the command:

your-username ALL=(ALL:ALL) ALL

where ALL=(ALL:ALL) ALL stands for: allow the specific user (your-username) to access all the terminals, as if he/she were any other user, and allow him/her to execute the full range of commands.

And you will obtain something similar to this:

# User privilege specification
root ALL=(ALL:ALL) ALL
your-username ALL=(ALL:ALL) ALL

Try it! (..if you need…)

——————-

References:

https://help.ubuntu.com/community/RootSudo

If you liked YUMEX, don’t miss YUM EXTENDER (DNF) for Fedora 22

If you are one of them (like me) that prefer to manage and/or install software through an easy to use GUI, don’t forget to migrate to the new version of the “old” YUMEX.
Open your favourite Terminal and type:
su
dnf install yumex-dnf

Follow the instructions that appear on the screen and enjoy the new DNF GUI manager for Fedora 22.

Hibernate for Ubuntu

Since the Ubuntu 12.04 LTS the hibernate icon disappeared as possible option at the shutdown. It is not a big loss if you are not used to use (or overuse) it as I often do. Personally I think that the hibernate feature is really useful when you want to freeze your computer maintaining all the windows -and the work- you are working on at a precise moment. 

Ubuntu decided to “cut” this particular command from its GUI because it registered a remarkable number of problems caused by hardware conflicts in modern computers. 

If you use Ubuntu and you think that hibernate could till be useful for you (especially during busy working days), it is possible to insert again this specific feature as GUI on your Desktop.

First of all you have to test if your computer contains the right hardware for “hibernate” so open Terminal and type:

sudo pm-hibernate

The computer will hibernate itself but you have to reboot it to understand if hibernate worked properly in your case.

I hope (as it was for my PC) that all has gone well. In this case you can start to create the dedicated icon on your upper bar.

Before of starting it’s necessary to understand that the hibernate command will use the SWAP partition to save your temporarily data. Usually it is recommended to have a SWAP partition with, at least, the double of space of your RAM.

So I suggest to install Gparted to check the SWAP space and, only if necessary, increase your SWAP partition reducing the primary partition. Please, do this only after you safely backup all the data in your computer because this procedure could be risky if you are doing it for the first time and you have not enough experience:

sudo apt-get install gparted

Open a Terminal and install gedit and gksu (if you don’t have them already installed on your machine) typing:

sudo apt-get install gksu && sudo apt-get install gedit
Then type:
sudo gksu gedit /etc/polkit-1/localauthority/50-local.d/com.ubuntu.enable-hibernate.pkla
Now a blank gedit document, named enable-hibernate.pkla will appear on your screen.

Copy and paste the following text to “compile” it:

[Enable Hibernate]

Identity=unix-user:*

Action=org.freedesktop.upower.hibernate

ResultActive=yes

Save it and reboot your computer.

A new icon will appear on the right corner of the upper bar. When you click on it, a Terminal window will appear asking for the system password. Type it and click on Return and your PC will immediately hibernate. 

Good busy working days!

How to install Ubuntu 12.04 on old computers with non PAE CPU

When I tried to install Ubuntu 12.04 on an old ThinkPad X40 I was surprised to discover this warning on my screen:

This kernel requires the following features not present on the CPU:
pae. Unable to boot - please use a kernel appropriate for your CPU.

In few words I wasn’t able to install Ubuntu 12.04 because the kernel on Ubuntu 12.04 was not supporting my CPU and I was really upset because I have always promoted Linux distributions as the most versatile and appropriate OS to keep using “old” hardware.

Sincerely, as described in an older post, I previously decided to install MATE desktop environment because the graphic cards on many laptops didn’t support Unity and Gnome 3 but this was the first time I had to renounce the installation of Ubuntu. I didn’t want to surrender to this difficulty (that appeared to me as a bug)!

First of all, I discovered that pae is “a feature to allow 32-bit x86 processors to access a physical address space (including random access memory and memory mapped devices) larger than 4 gigabytes“. After I clarified this point, I was not sure that my processor was totally inadequate to support Ubuntu 12.04.

After some web surfing I discovery that there are two easy solutions to avoid this problem.

1 – As first solution you can install Lubuntu (my choice) or Xubuntu on your computer then you can install the ubuntu-desktop using the Package Manager.

2 – If you prefer not to use the Package Manager you can install Ubuntu 11.04 or 11.10 and then upgrade Ubuntu to 12.04.

More in general, it is also possible to assume that if you have a non PAE CPU, your hardware could not be able to support the Unity desktop. For  this reason you can keep your Lubuntu – Xubuntu (based on the light but effective LXDE desktop) or switch your desktop environment to Gnome (the Classic, of course) installing the gnome package instead of ubuntu-desktop.

In any case, if you want to know if your CPU supports pae you have to open a Terminal and type:

grep --color=always -i PAE /proc/cpuinfo

If something like “flags: fpu vme de pse tsc msr pae mce cx8…” outputs on your Terminal, you have a pae CPU otherwise your CPU doesn’t support pae.  AddThis

The good third choice: MATE desktop environment. The traditional but rock solid solution for the Unity unhappy users (when also Gnome fails)…

My first Linux OS was a Knoppix but I had so many problems with the hardware drivers, the LAN configuration and the monitor settings that I was really discouraged. After many tests I decided that Ubuntu was the right OS for my notebooks and I continued to use it without any particularly matters till Unity.

Unity is nice to see, intuitive but if you use your OS in a stressful way (I mean doing three or four different tasks all together: reading emails, talking with Skype and writing on LibreOffice), you spend too much time looking for the icon you need to launch the right program. The vertical monitor space has not enough room to visually show all the icons related to programs I use everyday. Surely this is my personal matter but I actually prefer the “old” graphic interface. For this reason I decided to install Gnome 3 but my vetust IBM Thinkpad crashed a couple of time in a week.

To my surprise also the Gnome Classic option encountered some crashes due to the amount and diversity of the software I installed on my laptop during the last years.

As usual, after some web searches I found a solution: MATE. This particular desktop environment is a fork of Gnome 2 and it really looks very intuitive and easy to use. If some software conflicts with the MATE environment, a pop-up message will appear on your sceeen and, if you have the patience to read the Details contained in it, you will able to solve your problems. In my particular case (don’t ask me why) it helped me to focus my attention on Conduit which caused the crashes on Gnome.

To easily install MATE, on almost every Linux distribution, you can read its wiki dedicated page or directly follow the below instruction if you use Ubuntu 12.04.

– open Terminal and type these command lines:

sudo add-apt-repository "deb http://repo.mate-desktop.org/ubuntu oneiric main"
sudo apt-get update
sudo apt-getinstall mate-archive-keyring
sudo apt-get update
sudo apt-get install mate-core
sudo apt-get install mate-desktop-environment

When the Terminal finishes all the upgrade stuff, reboot your Ubuntu 12.04 and select MATE on the login screen (click on the upper right “gear” and choose MATE).

That’s all! Have a good week! AddThis

Recovering deleted files from USB disks on Ubuntu

Everyday we use USB keys to transfer data without transmitting them through the t. The USB keys and portable disks are small, light and their data capacity allow us to move in privacy huge files. This idyll sometimes is broken by a fatal mistake: we unintentionally delete an important file. Normally, if we are smart we recover the erased file in the Trash but in other situations when we realize the mistake we had made is too late.

In this circumstances is very import to stop to use our USB key or portable disk till we are able to use a good software for data recovering. On Ubuntu you have a wise number of dedicated software that can do this job for you, the most powerful run on Terminal as testdisk, foremost, and scalpel but you can also use a “minimal GUI” software as PhotoRec.

PhotoRec is very intuitive to use and it is able to recover many data formats from jpeg to db. After you install it using Synaptic Package Manager or the Software Center you can launch it in Terminal with:

sudo photorec

Immediately a GUI Terminal interface appears and you have just to follow the instruct  ions you visualize on your monitor.

Using the arrows and the Enter keys you have to:

1 – Choose the USB device from where you want to recover the data

2 – Select the partition table (usually Intel)

3 – Specify the partition table

4 – Select the right filesystem where the data were stored

5 – Decide if you want to try the data recovering from all the free space

6 – select the directory where you want to store the recovered data. IMPORTANT: do not store the recovered data on the same USB key you are scanning for recovering

7 – Wait till PhotoRec finishes the recover operations.

PhotoRec is fast and, during our tests, we were able to recover almost the 100% of data. Not bad!!! AddThis

How ro repair Ubuntu 10.04 LTS if the Update Manager and Synaptics don’t work

After I installed some new software I wasn’t able to update Ubuntu 10.04 LTS. The Update Manager was not able to check for updates and when I tried to use the Synaptic Package Manager I hadn’t better results. A reboot was not the right solution and I tested different ways to solve my problem saving the Ubuntu installation in my computer.

Searching on internet I discovered that there are few possible solution to avoid this problem and, in case you have the same bug on your computer, I decided to sum-up the most powerful after I successfully tried them.

First of all you can try to force the update process through the Terminal typing:

sudo apt-get update
sudo apt-get upgrade

If this doesn’t work you will try with this next step:

sudo rm var/lib/dpkg/lock
sudo dpkg --configure -a

Then launch again the Update Manager to verify if you succeed and if nothing happened solve the matter typing:

sudo rm /var/lib/apt/lists/* -vf
sudo apt-get update

and try again to launch the Update Manager.

In my case this was enough to restore all the Update Manager features and solve the problem. If you have extra problems about this bug or if you want to suggest alternative solutions, please, don’t hesitate to comment this post. AddThis